

One of the many (and somewhat hidden) features of GoogleEarth is the capability of adding custom OGC Web Map Services (WMS). The connection to the WMS and its content can then be saved as a KML file and shared with others. Any user who opens the file in GoogleEarth will automatically add the WMS to their GoogleEarth session in the same configuration in which it was saved.
Here's how to do it.
1) Launch GoogleEarth
2) From the "Add" menu, select "Image Overlay"
3) You should get a dialogue box like this when you select the "Refresh" tab.
 4) Click on "WMS Parameters"
5) A dialogue box like the following should appear...
 6) You may select a WMS from the drop-down list...
or add your own by clicking "Add..."
7) Enter the URL for a working WMS in the dialogue box such as...
http://speedy.ersc.wisc.edu/cgi-bin/latest_wi_goes?
8) If your WMS is valid, you should get a list of layers to choose. [T] = Transparent and is based on the configuration of the WMS. Select and arrange the layers for viewing with the middle buttons.
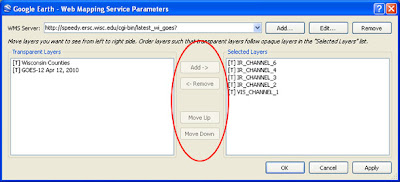
9) If you are using my WMS example, select any combination of Channels 1 through 6 and arrange them so that the layer you want on top is at the bottom of the stack (counter intuitive, I know).
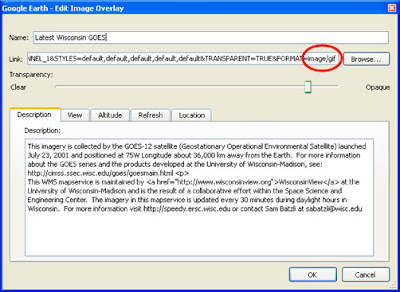
10) Finally, give the layer a title and some descriptive information. This interface seems to default to a GIF image type. For most imagery you will want to use PNG and that can be changed in the "Link" (see above). Once the WMS is placed on the globe, you can return to the properties by right-clicking the layer name. This is also where you "Save Place As..." KMZ or KML (KMZ is just Zip-compressed KML). I recommend using the initial saved KML as a starting point. In a text editor you can enhance the KML by separating layers, adding buttons, descriptions, and even logos. (See the KML Reference for more info).
 This example uses this KMZ
That's it! Have fun!
